


Relevant articles:


Charles Pretzer
January 20, 2022
One of the core goals for Linkerd is to “just work”. This includes running on any modern distribution of Kubernetes. For most Kubernetes environments, that means you don’t have to do anything special to run Linkerd. But OpenShift is a lot more than just vanilla Kubernetes, so we have to make a few tweaks to our standard installation.
This guide walks you through the steps to deploy Linkerd on OpenShift as the cluster-admin user, taking into account the networking and security requirements that are fundamental to OpenShift.
OpenShift
RedHat’s OpenShift was one of the early enterprise distributions of Kubernetes. It features a security model that is focused on multi-tenancy through Namespace isolation. In OpenShift terms, each Namespace is a “project”, and there are distinct roles for administration of the project and management of the services that are deployed there.
To fit Linkerd into this model, we’ll deployed Linkerd using OpenShift’s System users role. We’ll grant privileged access to the ServiceAccount resources used by Linkerd’s CNI and control plane to allow them to operate. Finally, OpenShift requires that the Linkerd Helm chart deployments do not create namespaces themselves, so we’ll handle that as well.
Prerequisites
This tutorial assumes that you have already installed OpenShift Container Platform, e.g. by following these instructions.
There are also a few pieces of software that we use in this tutorial:
- The Linkerd CLI
- The Helm CLI
- The Smallstep CLI to generate TLS certificates
- Openshift’s oc CLI
Since we’ll be using Helm to deploy things, you’ll also need to add the Linkerd Helm chart repo to your set of available repositories:
Deploying Linkerd
In this guide, we’re going to deploy two core Linkerd Helm charts, a Linkerd extension, and a sample application. In each of the deployment steps, you’ll see a repeating pattern of commands:
- Create a project in OpenShift
- Add some annotations and/or labels to the Namespace resources associated with the projects
- Grant the appropriate permissions to the ServiceAccounts of the Linkerd components
- Deploy a Helm chart
- Validate that things are working
It’s a little repetitive but it’s not actually that difficult. So let’s get started!
Deploy the Linkerd CNI Plugin
The default network model for OpenShift is the OpenShift SDN, which uses CNI. The first step to deploying Linkerd to OpenShift is to deploy the Linkerd CNI plugin. This plugin will “chain” on top of the OpenShift CNI plugin to configure the iptables of each node to manage traffic for the Linkerd proxies. (This replaces the InitContainer approach that Linkerd will use in less restricted systems, which requires NET_ADMIN capabilities that OpenShift will deny.)
Create the linkerd-cni project in the cluster with the oc binary:
Add a Namespace annotation to exclude the Linkerd CNI pods from being injected with the Linkerd proxy:
Add the privileged security container context to the linkerd-cni ServiceAccount:
Finally, we’ll use Helm to deploy the linkerd-cni chart. We need to configure a few parameters with custom values:
- installNamespace=false ensures that the linkerd-cni namespace is not created as part of the chart deployment
- destCNIBinDir and destCNINetDir are set to the directories that OpenShift uses for storing CNI binaries and configuration scripts
Putting that all together, we have:
And that’s it! You can now run oc get ds -n linkerd-cni and you should see the replica configuration for the linkerd-cni DaemonSet. Be sure that the desired number of replicas is the same as the running replicas, and that there is one replica per worker node in your cluster.
Deploy the Linkerd Control Plane
With the CNI installed, we turn our attention to the Linkerd control plane itself.
Create the linkerd project in the cluster with the oc binary:
Add a Namespace annotations and labels to the linkerd namespace:
Add the privileged security container context to the linkerd ServiceAccounts:
Generate the trust anchor and issuer certificates that Linkerd will use. (Of course, you can skip this step if you already have your own certificates.)
Deploy the Linkerd Helm chart. As before, we’ll configure a few parameters:
- installNamespace=false ensures that the linkerd namespace is not created as part of the chart deployment.
- cniEnabled=true configures Linkerd to use the linkerd-cni plugin that we deployed in the last section.
- identityTrustAnchorsPEM=certs/ca.crt configures Helm to use the certificate created in the previous step for the trust anchor.
- identity.issuer.tls.crtPEM=certs/issuer.crt configures the identity issuer certificate that is used to sign proxy certificate signing requests.
- identity.issuer.tls.keyPEM=certs/issuer.key configures the key to use when signing the proxy certificate signing requests.
- identity.issuer.crtExpiry=$exp sets the expiration date for the issuer certificate
Putting that all together, we have:
Once the Helm deployment is complete, you can run linkerd check -–linkerd-cni-enabled and make sure that all the checks are successful!
Deploy the Buoyant Cloud Agent
Buoyant Cloud is how enterprises manage their Linkerd deployments across their clusters. Buoyant Cloud will give you full visibility into the Linkerd control and data planes, with actionable metrics for latency and success/error rates, as well as details about policies and certificate validity.
We’ll use the linkerd-buoyant extension to deploy the Buoyant Cloud Agent to the OpenShift cluster.
Create the buoyant-cloud project in the cluster with the oc binary:
Add annotations and labels to the buoyant-cloud namespace:
Add the privileged security context to the buoyant-cloud ServiceAccount. (Note that the context is “anyuid” which is less powerful and more restricted than the “privileged” context.)
Download the linkerd-buoyant CLI:
Install the extension. This will open a browser window to create or log in to a free Buoyant Cloud account.
You should soon see Linkerd’s metrics and health percolate into the Buoyant Cloud dashboard:
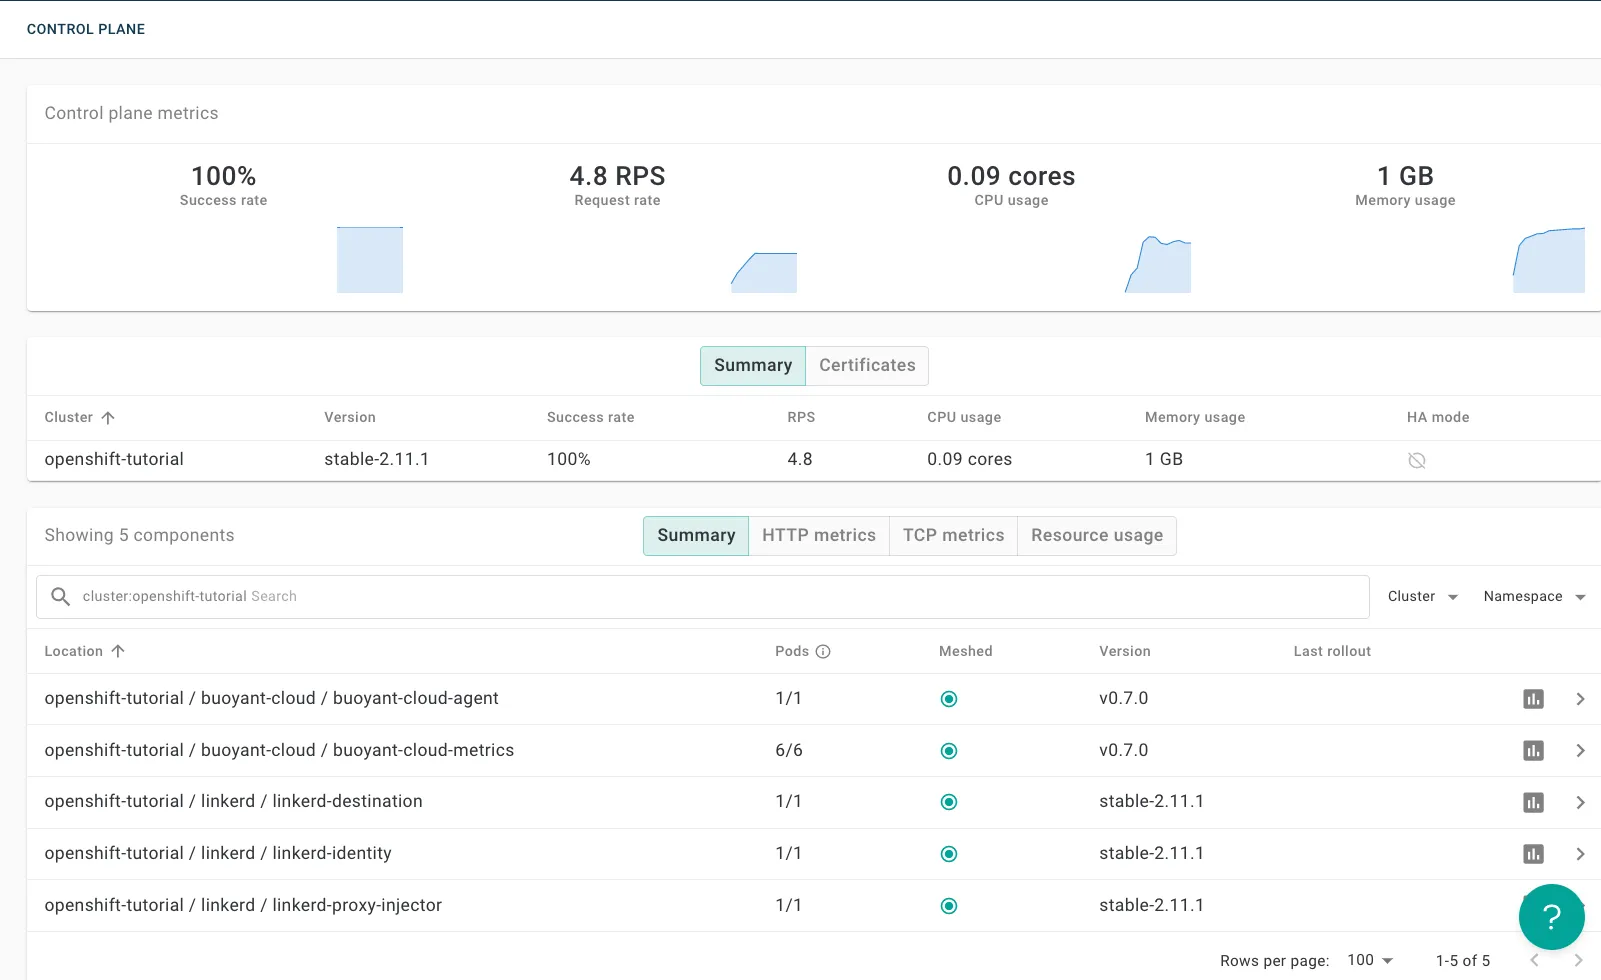
Buoyant Cloud Dashboard Overview.
Deploy the Emojivoto demo app
Finally, we’ll deploy the Emojivoto demo application and “mesh” it with Linkerd.
Create the emojivoto project in the cluster with the oc binary:
Annotate the emojivoto namespace to enable proxy injection for all pods in the namespace.
Use oc to apply the manifest:
Once all the emojivoto pods have started, the vote-bot pod will send traffic automatically to the web workloads to simulate traffic. Buoyant Cloud immediately begins to collect metrics from the application and control plane pods, so you can use the Buoyant Cloud dashboard to see real-time metrics between the pods. The dashboard also shows that the proxies are using mTLS communication, validating and encrypting the traffic between the pods.
You can now go back to your Buoyant Cloud account to see the metrics, service topology, and other details for emojivoto.
Emojivoto topology in Buoyant Cloud

Emojivoto metrics in Buoyant Cloud
Summary
Congratulations, you’ve deployed Linkerd to OpenShift, along with a fully meshed application and a state-of-the-art management dashboard.
Thanks for taking the time to go through this tutorial. I hope you found it useful, and if you have any questions please feel free to reach out to me at @Charles Pretzer on the Linkerd Slack.


 LinkedIn