

Demo: Migrating from Istio to Linkerd


Scott Rigby
August 6, 2024
Did you read the Migrating from Istio to Linkerd blog post and are ready to explore a migration? Before diving into your production environment, test the waters with this step-by-step guide to setting up a demo migration. While this walkthrough provides a valuable learning experience, remember that production migrations require careful planning. Be sure to revisit the Planning the Migration section before tackling your production clusters.
In the first migration blog post, we provide an overview of all the concepts and the context you need for a successful migration. If you haven't read it, we recommend you do so before going through this tutorial. If you did, let's get right to it!
Hands-on demo
Prerequisites
To follow along with this tutorial, you'll need to install:
- docker
- k3d
- kubectl
- istioctl
- linkerd
- siege
I'm on a MacBook, so I use Homebrew for most of this – we’ll install the Linkerd CLI later.
$ brew install k3d kubectl istioctl siege
$ brew install --cask docker
Version check
Current versions as of this tutorial:
$ docker --version
Docker version 26.1.1, build 4cf5afa

$ k3d version
k3d version v5.6.3
k3s version v1.28.8-k3s1 (default)

$ kubectl version --client
Client Version: v1.30.1
Kustomize Version: v5.0.4-0.20230601165947-6ce0bf390ce3

$ istioctl version
istioctl version --remote=false
1.22.1
Ok, looks like we're good! There may be differences in future versions, so it's always good to check which you're running.
Create demo cluster
For this demo we're using the k3d wrapper to install k3s locally.
# We're telling k3d not to install Traefik with "--disable" since we won't be using it
$ k3d cluster create demo --k3s-arg '--disable=traefik@server:0'
Install sample app on Istio
Let’s use the bookinfo project from Istio to demonstrate a migration. We'll mostly follow the Istio Getting Started guide and also draw from other Istio docs for steps to ensure it works correctly on our local k3s cluster.
1. Install Istio
The demo profile is suitable for Istio's Bookinfo application. There are many additional Istio features we could add, but we'll stick strictly to Istio's Bookinfo application to simulate our migration:
$ istioctl install --set profile=demo -y
Label the default namespace. Adding a namespace label instructs Istio to automatically inject Envoy sidecar proxies when you deploy the sample application next.
$ kubectl label namespace default istio-injection=enabled
2. Install Bookinfo sample app
# Neat trick to find the currently installed Istio version
$ ISTIO_VERSION=$(kubectl --namespace istio-system get deploy istiod -o jsonpath='{.metadata.labels.operator\.istio\.io/version}')

# For example, if version is 1.22.1, the branch would be "release-1.22"
$ ISTIO_BRANCH=release-"${ISTIO_VERSION%.*}"

# Apply the matching manifest to install the Bookinfo sample application
$ kubectl apply -f https://raw.githubusercontent.com/istio/istio/$ISTIO_BRANCH/samples/bookinfo/platform/kube/bookinfo.yaml

# Wait until all pods report READY 2/2 and STATUS Running
# This might take a few minutes. CTRL-C to escape when ready and running
$ watch kubectl get pods
3. Expose the app to outside traffic using Istio Ingress Gateway
$ kubectl apply -f https://raw.githubusercontent.com/istio/istio/$ISTIO_BRANCH/samples/bookinfo/networking/bookinfo-gateway.yaml
gateway.networking.istio.io/bookinfo-gateway created
virtualservice.networking.istio.io/bookinfo created
For local demo purposes, we'll be port-forwarding (in the cloud, you would instead use the Istio Ingress Gateway load balancer's external IP).
$ kubectl -n istio-system port-forward svc/istio-ingressgateway 8080:80
Forwarding from 127.0.0.1:8080 -> 8080
Check that it works from outside of the cluster:
$ GATEWAY_URL=http://127.0.0.1:8080
$ curl -s "$GATEWAY_URL/productpage" | grep -o "<title>.*</title>"
<title>Simple Bookstore App</title>
If you want you can manually see the app in your web browser too:
$ open "http://$GATEWAY_URL/productpage"
4. Visualize app traffic on Istio
Install Istio's visualizer, Kiali, and other required addons to visualize traffic:
# A temp directory is an easy way to kubectl apply an entire folder from GitHub
$ dir=$(mktemp -d) && git clone --depth=1 --branch $ISTIO_BRANCH https://github.com/istio/istio.git $dir
kubectl apply -f $dir/samples/addons
In a separate terminal tab, send some traffic to the app through Istio Ingress Gateway:
# Siege is a nice tool for this
$ GATEWAY_URL=http://127.0.0.1:8080
$ siege -t=1H -c=10 $GATEWAY_URL/productpage
<LOTS OF OUTPUT>
In another terminal tab, use this command to port-forward and automatically open Kiali in your browser:
$ istioctl dashboard kiali
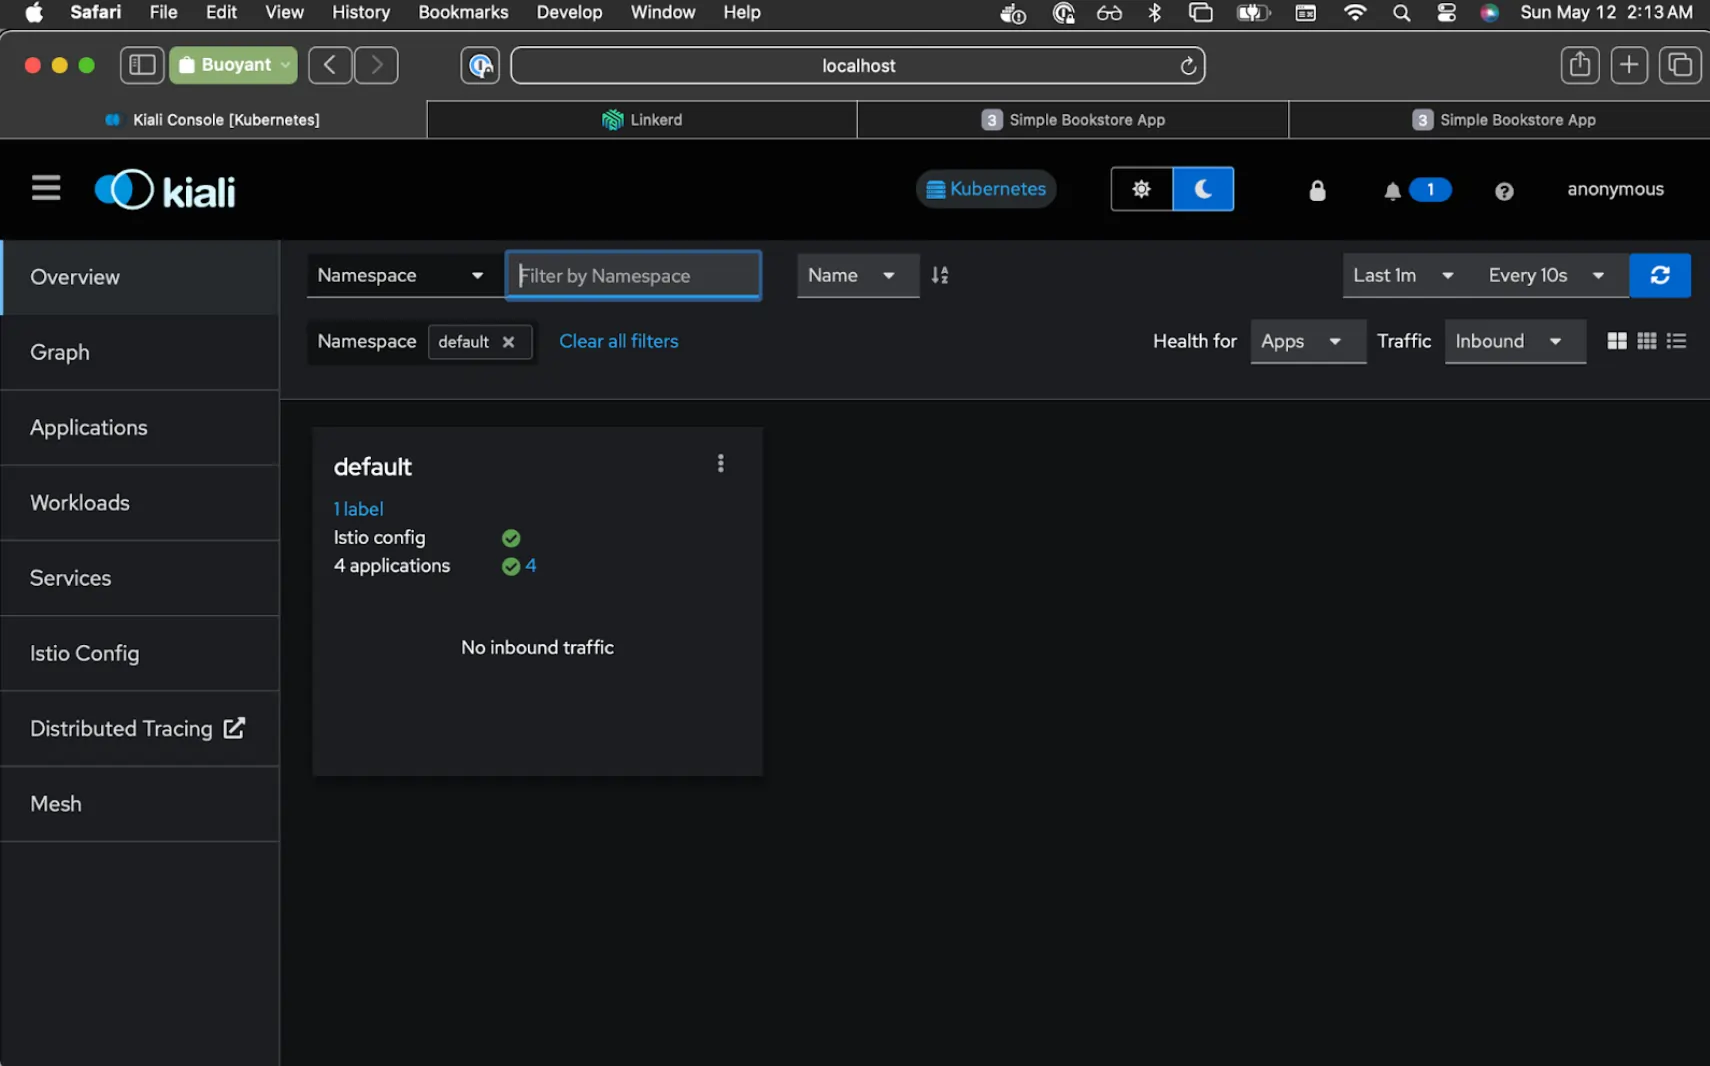
The Overview (default) page in Kiali should show something like this:
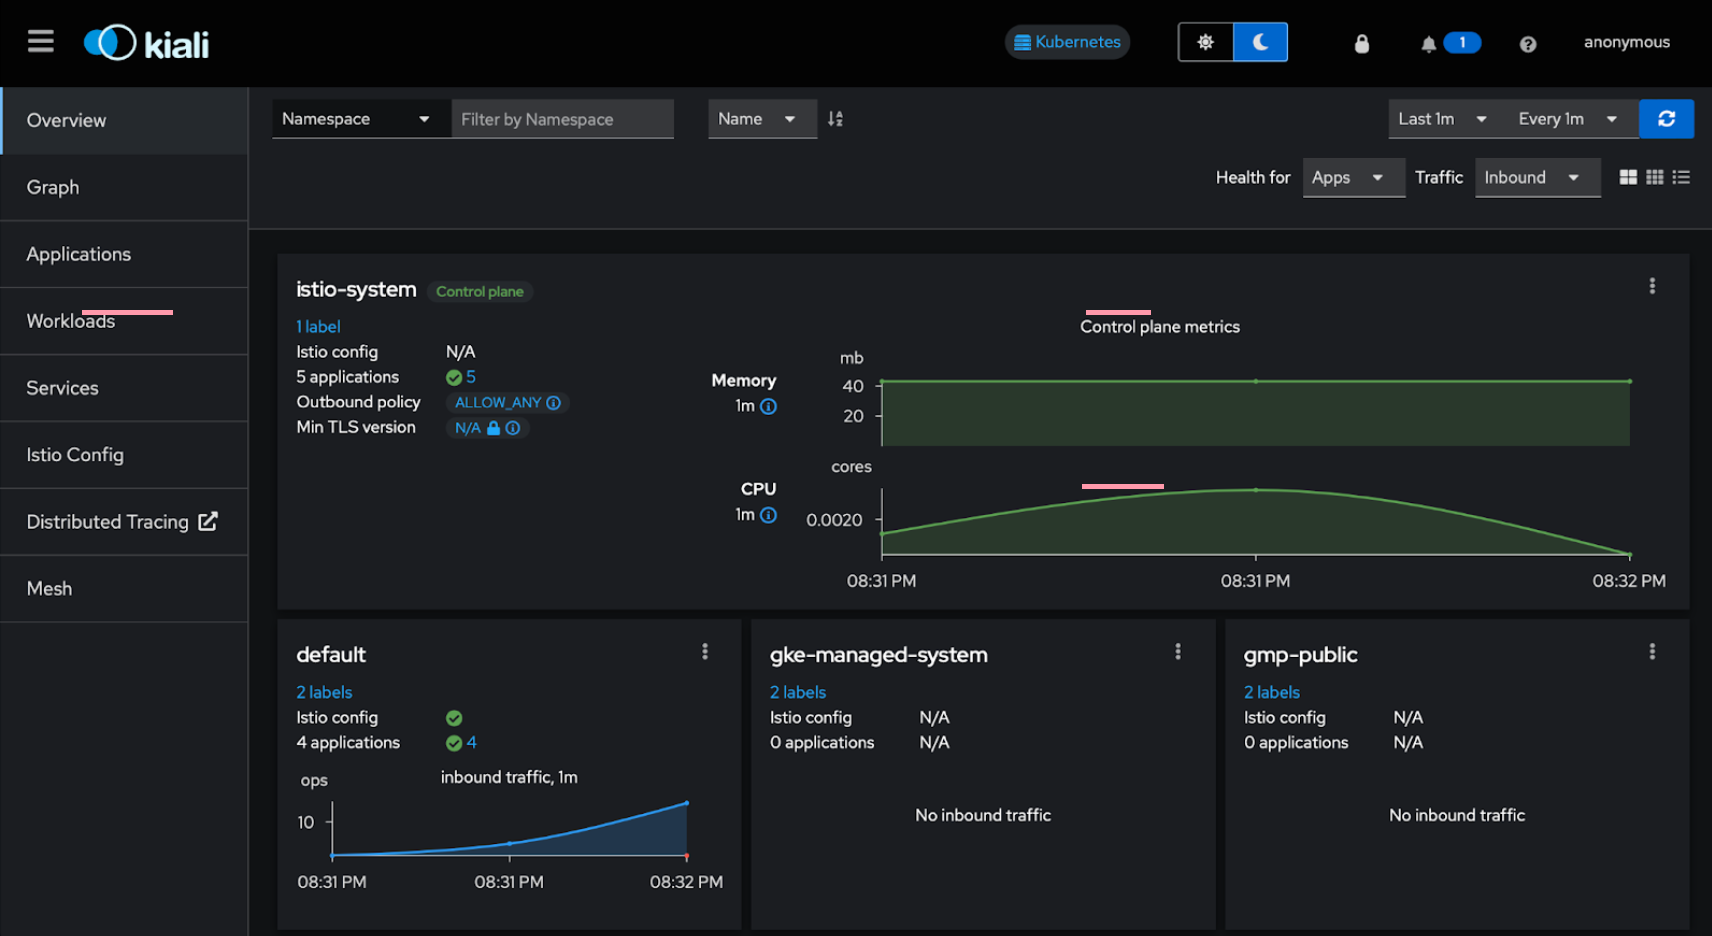
Click the Graph tab on the left, in the Namespace drop-down, select default, and on the right select Last 10m, and you should see the Versioned app graph (default):
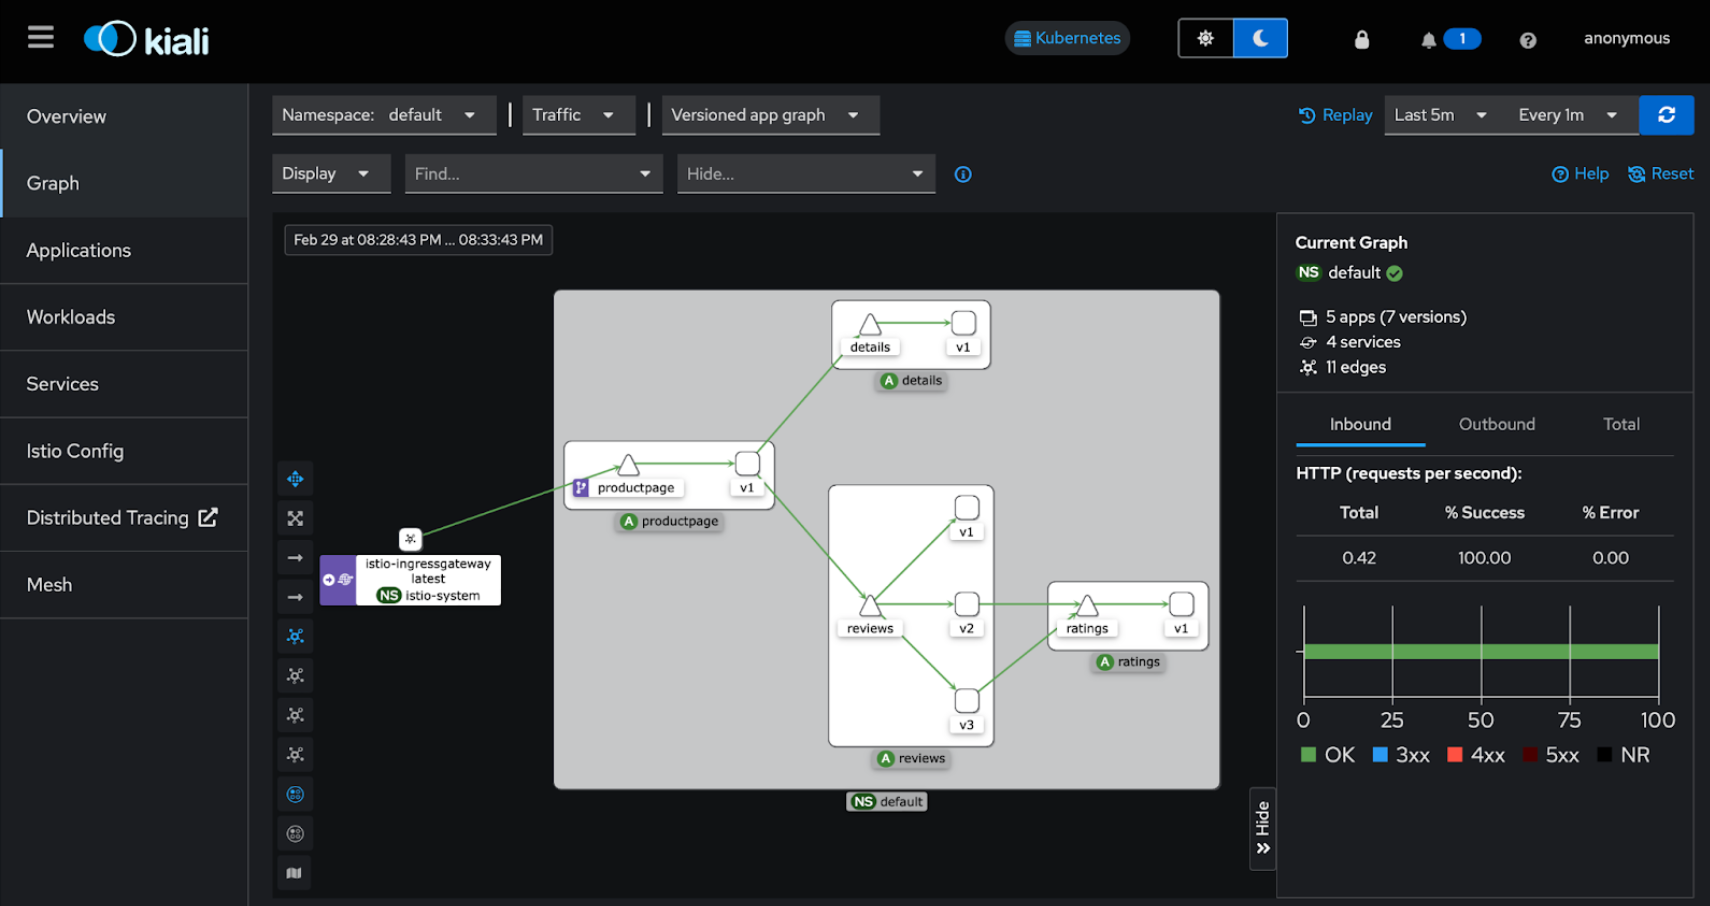
OK, we're all set up with a simulated simple Istio bookinfo app installation showing traffic through Istio. Now that we've got that sorted, let's move on to preparing for migration to Linkerd.
Replace Istio Gateway with an Ingress Controller

OK, so now we're on to the fun part. The Istio sample application is relatively simple to migrate to Linkerd, in several easy steps.
We’ll start with ingress. As of this writing (mid 2024), Linkerd doesn’t provide its own ingress solution (though it’s on the roadmap!), leaving the choice of using a third-party ingress controller or (as shown in the migration blog post) using the Istio ingress gateway in place. For this demo, let’s do it the hard way and replace the Istio ingress gateway with Ingress-NGINX instead!
This is pretty straightforward, but we’ll have to be sure to have Ingress-NGINX in place before migrating any workloads, so that we can avoid downtime during an in-place migration to Linkerd. We'll also be installing our mesh in non-strict mode so that both the Istio Gateway and new ingress controller can send traffic to our sample app at the same time
For simplicity, Linkerd does not provide its own ingress controller. Instead, Linkerd is designed to work alongside your ingress controller of choice for routing traffic. For this demo we'll use the popular Ingress-NGINX project.
1. Deploy the Ingress-NGINX controller
There are additional options here, but for this demo you just need to run:
# See https://github.com/kubernetes/ingress-nginx/releases for the most recent release
$ NGINX_VERSION=v1.10.1
$ kubectl apply -f https://raw.githubusercontent.com/kubernetes/ingress-nginx/controller-$NGINX_VERSION/deploy/static/provider/cloud/deploy.yaml
💡 Note for this demo we'll keep the default behavior that the controller watches all namespaces for ease. To change this, see scope section of the controller install guide.
2. Expose app to outside traffic using Nginx Ingress
Create a Kubernetes Ingress resource pointing to the sample app:
kubectl apply -f - <<EOF
apiVersion: networking.k8s.io/v1
kind: Ingress
metadata:
  name: productpage-ingress
  namespace: default
  annotations:
    nginx.ingress.kubernetes.io/ssl-redirect: "false"
    nginx.ingress.kubernetes.io/service-upstream: "true"
spec:
  ingressClassName: nginx
  defaultBackend:
    service:
      name: productpage
      port:
        number: 9080
EOF
💡 Note the nginx.ingress.kubernetes.io/service-upstream annotation is recommended by Linkerd for this Ingress controller wherever you use it. The nginx.ingress.kubernetes.io/ssl-redirect annotation is because we're not setting up SSL for this local demo.
In a new terminal tab, port forward the Ingress NGINX service as well:
$ kubectl -n ingress-nginx port-forward svc/ingress-nginx-controller 8081:80
Forwarding from 127.0.0.1:8081 -> 80
Check that this works from outside of the cluster too:
$ INGRESS_URL=http://127.0.0.1:8081
$ curl -s "$INGRESS_URL/productpage" | grep -o "<title>.*</title>"
<title>Simple Bookstore App</title>
Migrate sample app from Istio to Linkerd
1. Install the Linkerd CLI
We’re going to use Buoyant Enterprise for Linkerd for this tutorial. To follow along, you’ll need to register for a free Buoyant account at https://enterprise.buoyant.io/ (it only takes a few seconds). Once you’ve done that and set the BUOYANT_LICENSE environment variable as shown in the registration process, you’ll install the Linkerd CLI as described in the Getting Started guide:
# Install the Linkerd CLI
$ curl --proto '=https' --tlsv1.2 -sSfL https://enterprise.buoyant.io/install | sh

# Make sure the Linkerd CLI is on our $PATH
$ PATH=$HOME/.linkerd2/bin:$PATH

# Check the Linkerd version
$ linkerd version --proxy --client
💡The latest version of Buoyant Enterprise for Linkerd is currently enterprise-2.16.0 This guide also works with the latest edge release of Linkerd, currently edge-24.8.2 – to use an edge release, start with installing the edge CLI, as described in the edge release quick start.
Once you have the CLI installed, setting up Linkerd in a demo configuration is easy (these steps also come from the Getting Started guide, but we’re installing Linkerd Viz as well.)
# Validate your Kubernetes cluster
# You should see the CLI version. Also "Server version: unavailable"
# because we have not installed Linkerd on your cluster
$ linkerd check --pre
# Install Linkerd onto your cluster
$ linkerd install --crds | kubectl apply -f -
$ linkerd install | kubectl apply -f -
# Verify the installation
linkerd check
# Install the Linkerd Viz extension, which gets you the dashboard and other CLI goodies
# For now, we need to explicitly set the version to install!
$ linkerd viz install --set linkerdVersion=edge-24.8.2 | kubectl apply -f -
$ linkerd viz check
💡Remember that this installs Linkerd in a demo configuration (same as we did with Istio). For production installations, there’s a separate guide that you’ll want to check out.
2. Add Ingress-NGINX controller to Linkerd
Mesh the ingress pods, following the Linkerd common ingress options guide. Since we installed the ingress controller with a manifest (rather than with Helm) we can mesh normally by annotating either the Namespace or Deployment resource. Let's go with the Deployment (the effect is the same, with the main difference being you don't need to manually restart the pods):
$ kubectl --namespace ingress-nginx get deployment ingress-nginx-controller -o yaml | linkerd inject - | kubectl apply -f -
This produces:
spec:
  template:
    metadata:
      annotations:
        linkerd.io/inject: enabled
And after just a moment, you can see that the pod was injected correctly:
# Wait for pods to finish terminating and refresh
$ watch kubectl --namespace ingress-nginx get pods

# Check containers in the pod
$ kubectl --namespace ingress-nginx top pods --containers
POD                                         NAME            CPU(cores)   MEMORY(bytes)
ingress-nginx-controller-66cb8d65f5-m6l92   controller      3m           97Mi
ingress-nginx-controller-66cb8d65f5-m6l92   linkerd-proxy   1m           12Mi
3. Prepare default namespace for Linkerd sidecar injection instead of the Istio sidecar
While it's perfectly fine to have both Istio and Linkerd running in your cluster at the same time, we shouldn't inject two proxies on a pod at the same time, because each sidecar would fight for hijacking traffic in and out of the pod (the one that runs last in the race condition would win).
Luckily, switching from Istio to Linkerd's proxy is as simple as removing the istio-injection label on the namespace and replacing it with the linkerd.io/inject annotation, then restarting the pod. When the pod restarts, it will automatically contain the Linkerd proxy sidecar and no longer the Istio sidecar.
So we'll go ahead and make this change to the default namespace, since it's where we installed the sample app:
# Remove the istio label
$ kubectl label namespace default istio-injection-
namespace/default unlabeled

# Add the linkerd annotation
$ kubectl annotate namespace default linkerd.io/inject=enabled
4. Visualize app traffic switching to Linkerd
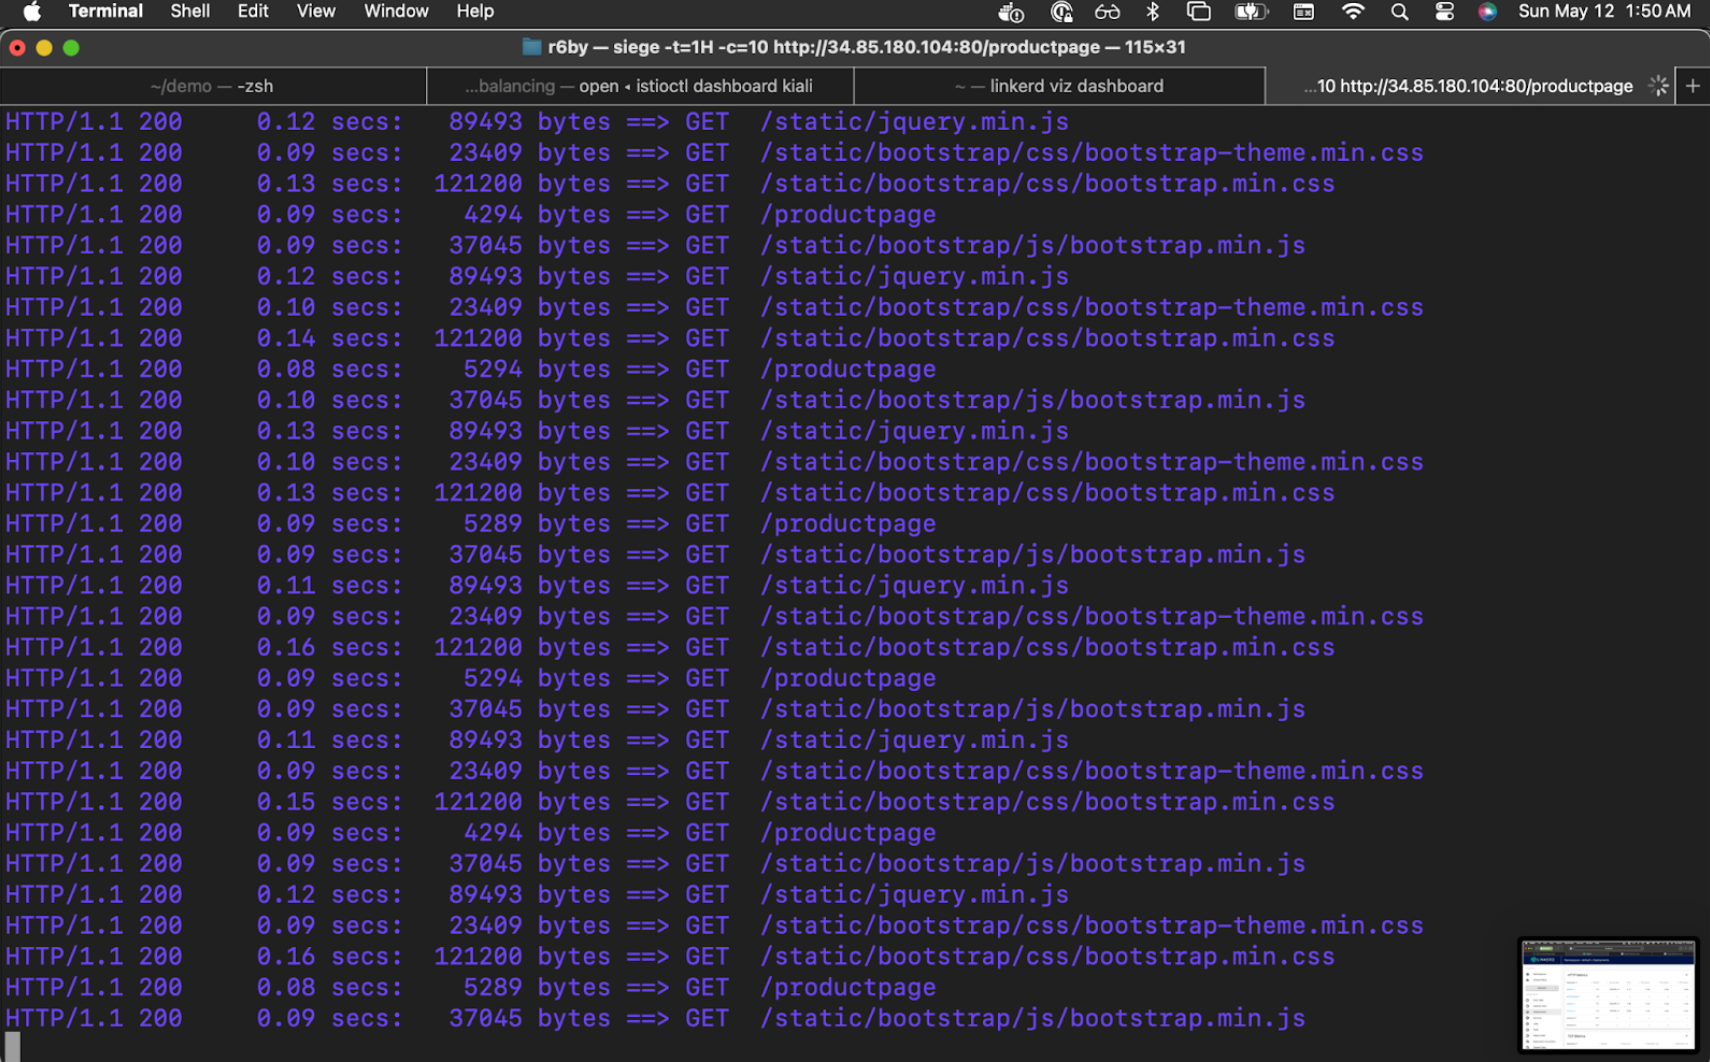
Similar to what we previously did for Istio, we'll also send some traffic to the same sample app through the Ingress NGINX service that we're already port-forwarding:
$ INGRESS_URL=http://127.0.0.1:8081
siege -t=1H -c=10 $INGRESS_URL/productpage
<MUCH OUTPUT>
In a separate terminal tab, port-forward and automatically open the Linkerd visualizer by running:
$ linkerd viz dashboard
Now we can toggle between Istio's Kiali and Linkerd's viz browser tabs as we watch each of the services switch over.
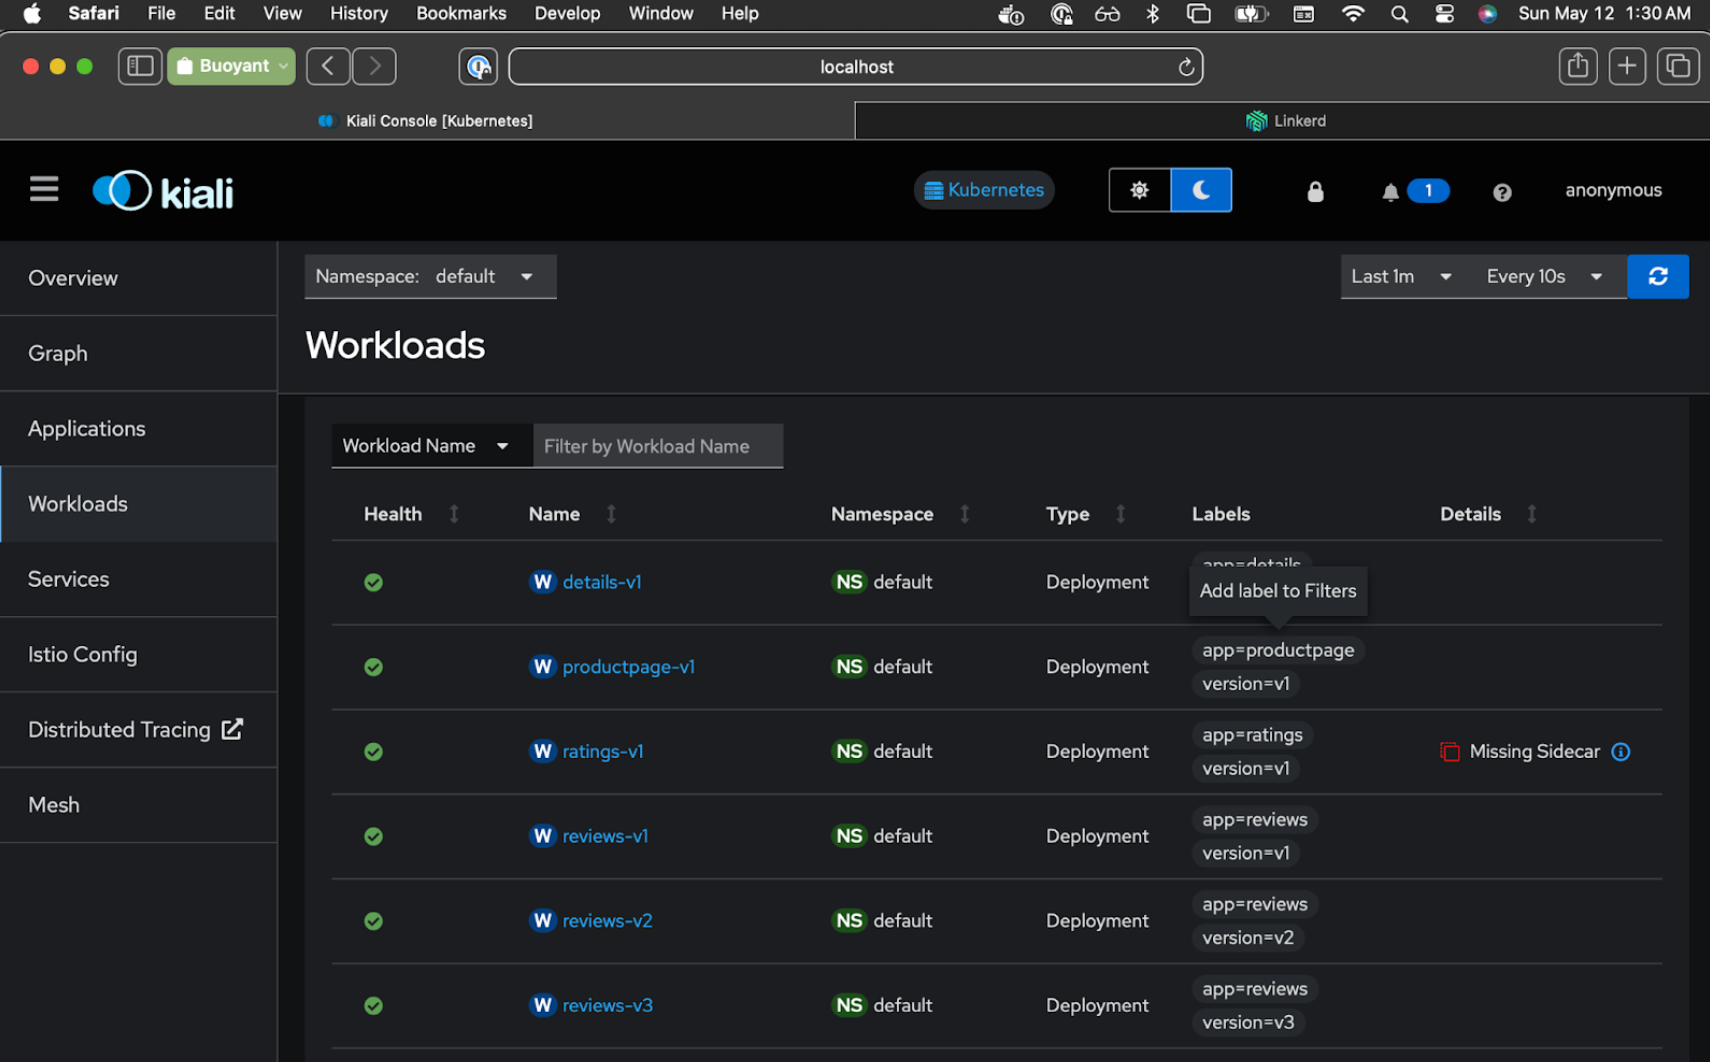
In Kiali, you'll want to click on the Workloads tab and make sure it's set to refresh every 10s. At this point, all the Bookinfo services are part of the Istio mesh.
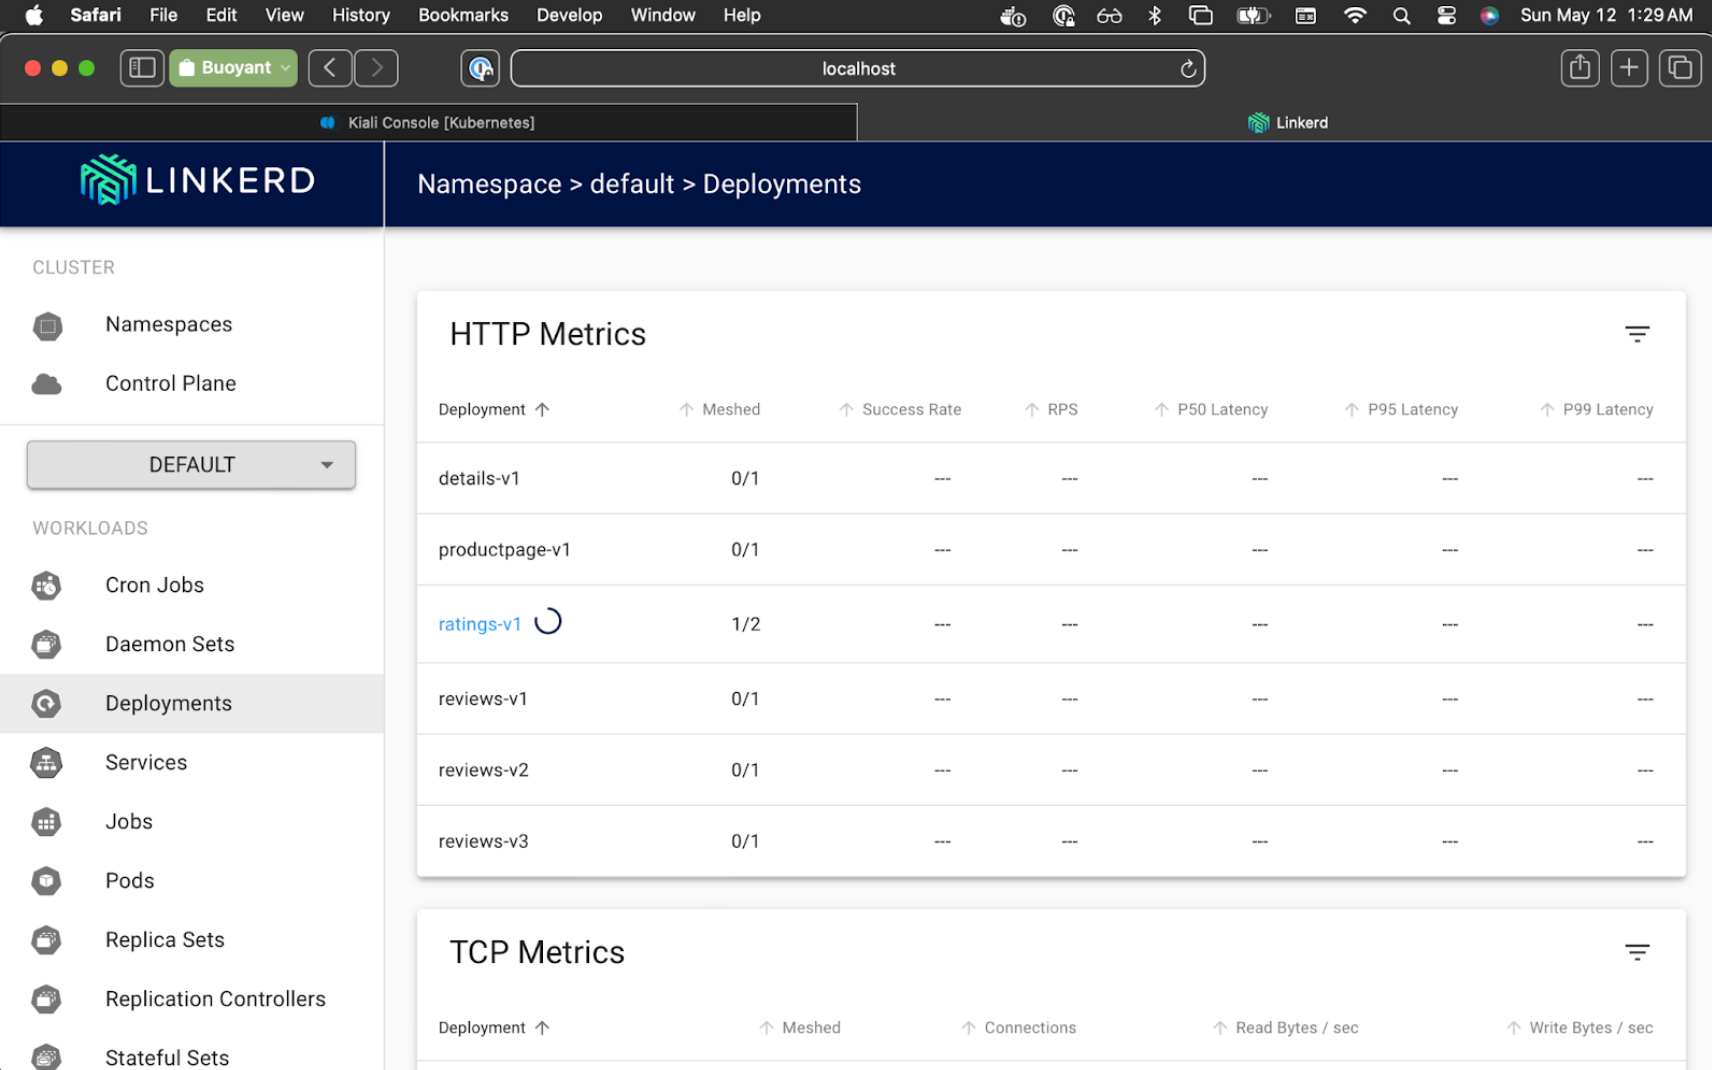
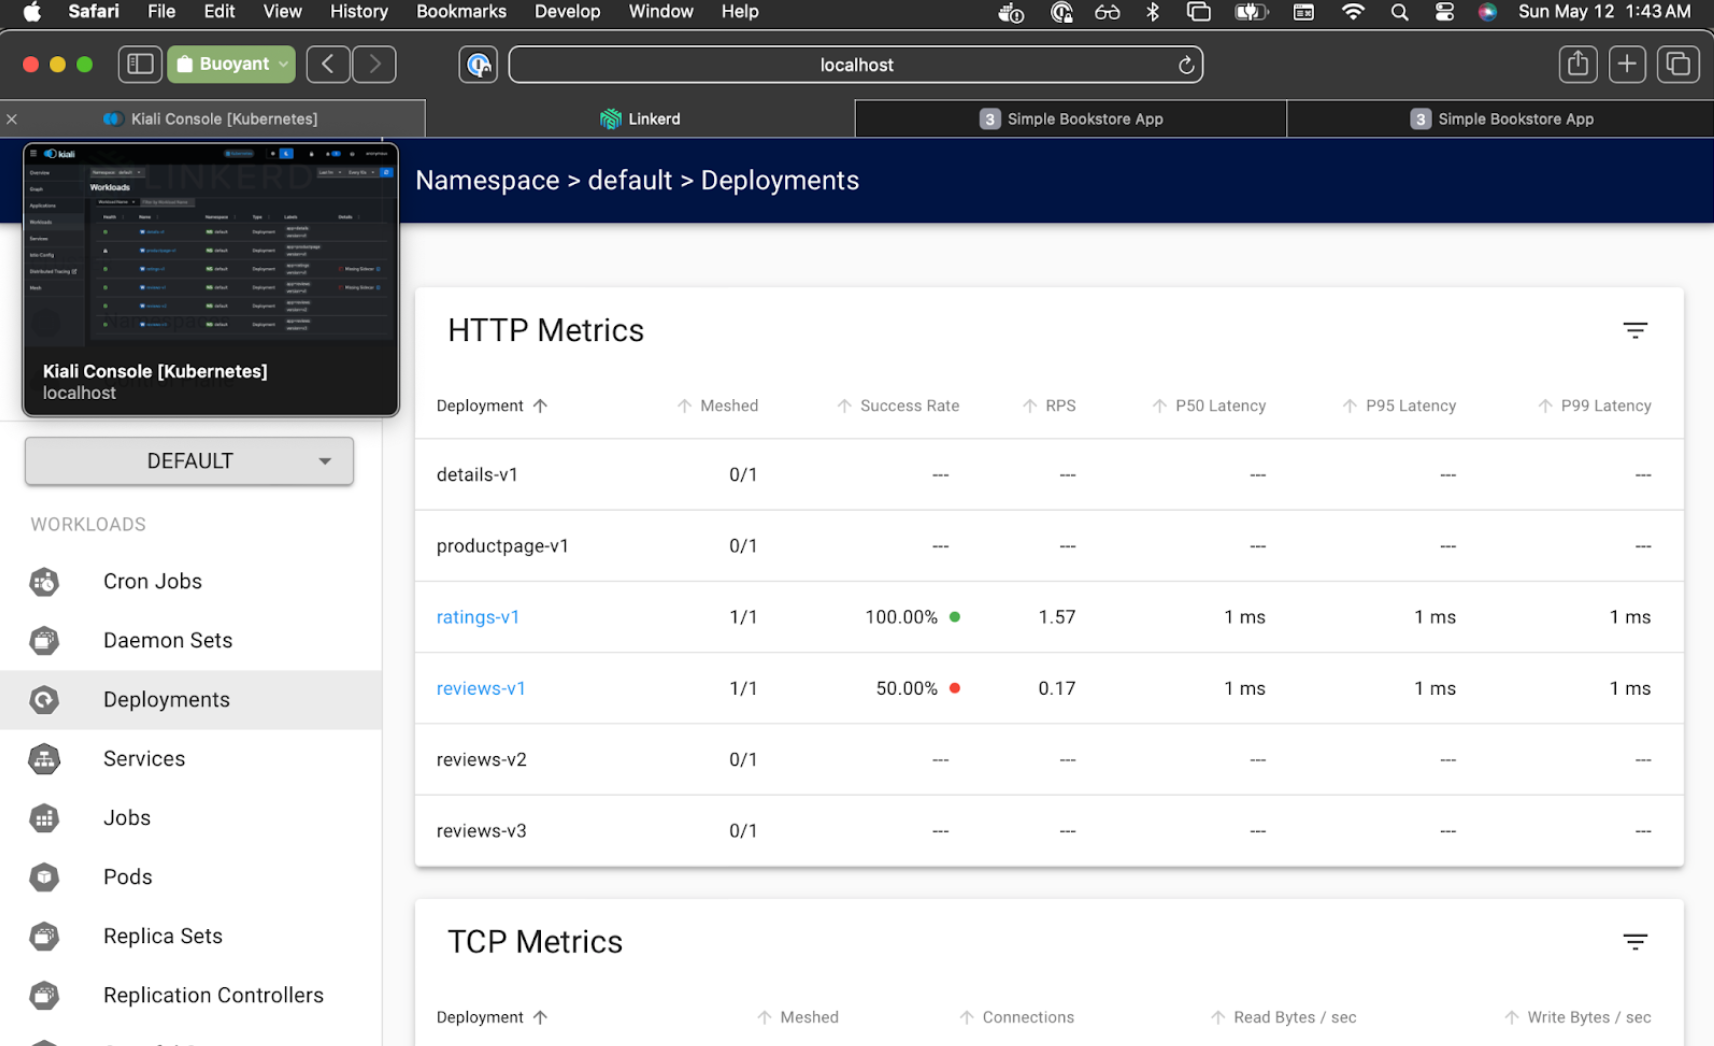
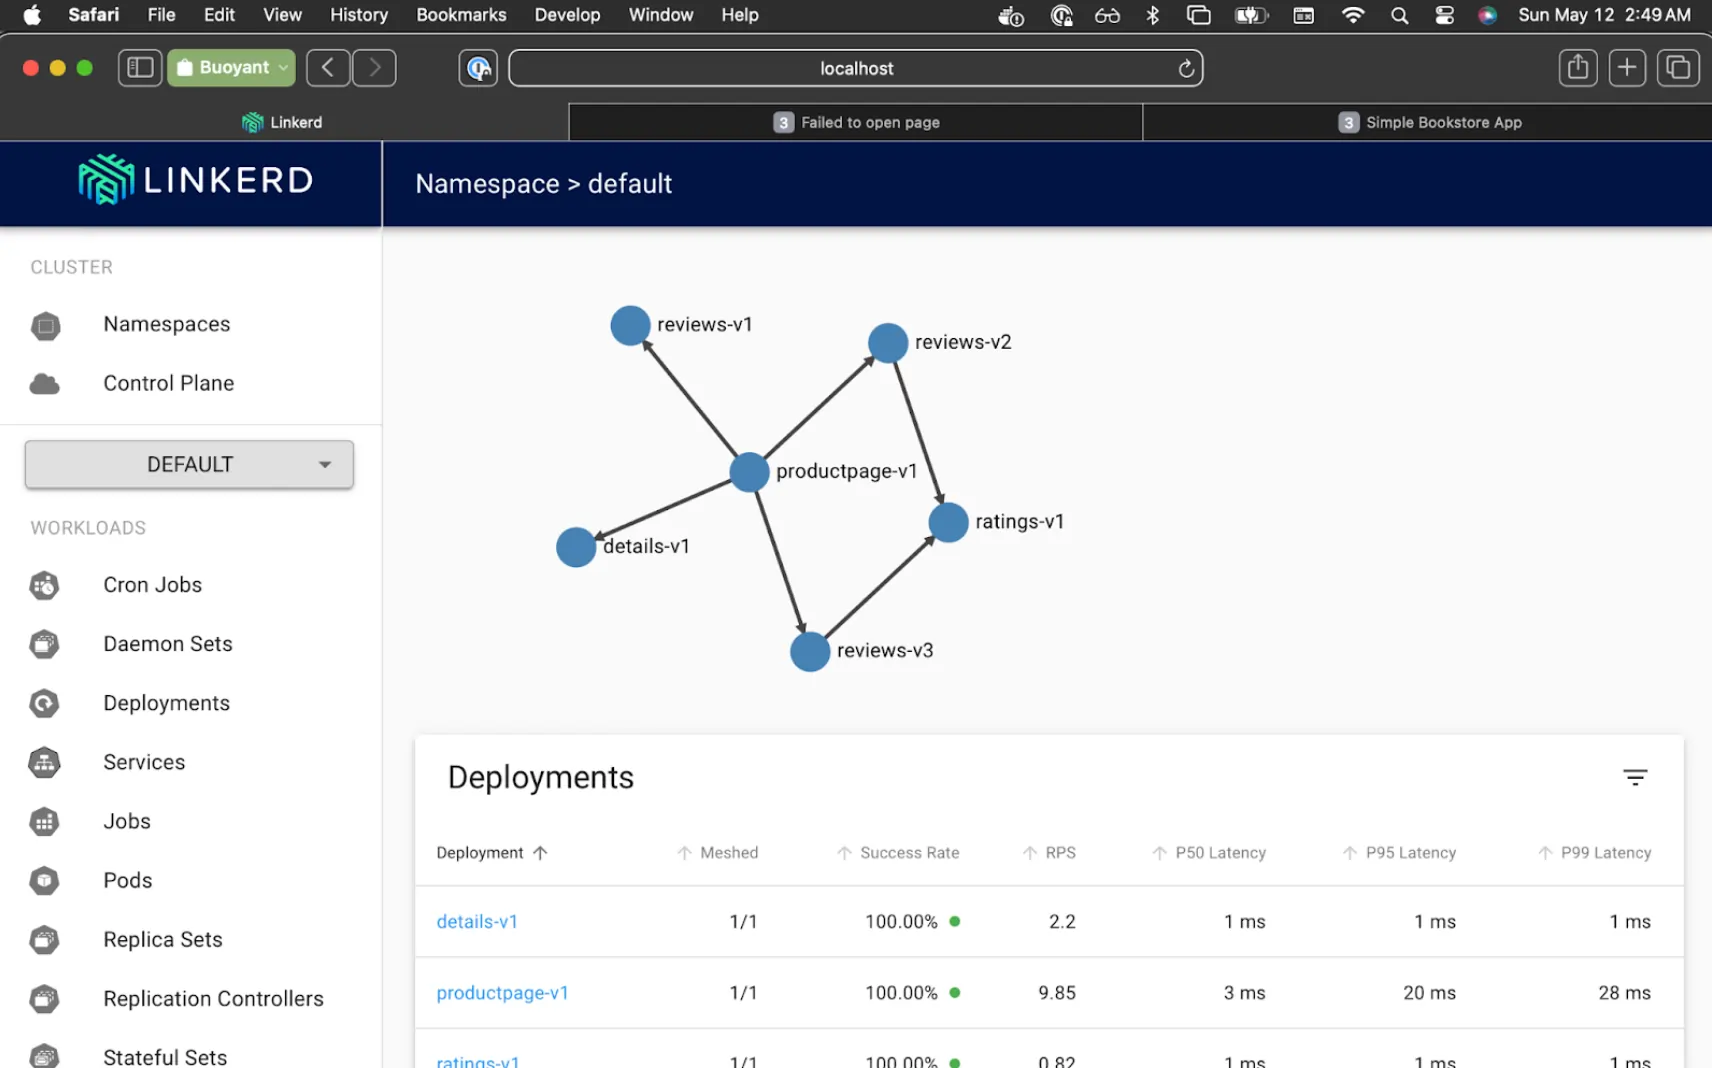
In Linkerd Viz, select the Default namespace, and click on Deployments. Each of the services will all say 0/1 at this point because they are not yet part of the Linkerd mesh.
Let's see what happens when we restart one service now that our namespace is set to inject the Linkerd sidecar instead of the Istio sidecar:
$ kubectl rollout restart deployment ratings-v1
One workload (ratings) is now part of the Linkerd mesh, whereas Kiali now reports the Istio sidecar as missing for that service. And all other workloads are still part of Istio mesh.
You may be wondering how rollout restart works to switch over the pods. Both Istio and Linkerd have a mechanism to inject their proxy sidecar, with Istio using a label and Linkerd using an annotation. (Istio calls this automatic sidecar injection, Linkerd calls it automatic proxy injection). In both cases, if you have the Istio label or Linkerd annotation on a namespace, any new pod created in that namespace will get the respective sidecar proxy injected into the pod.
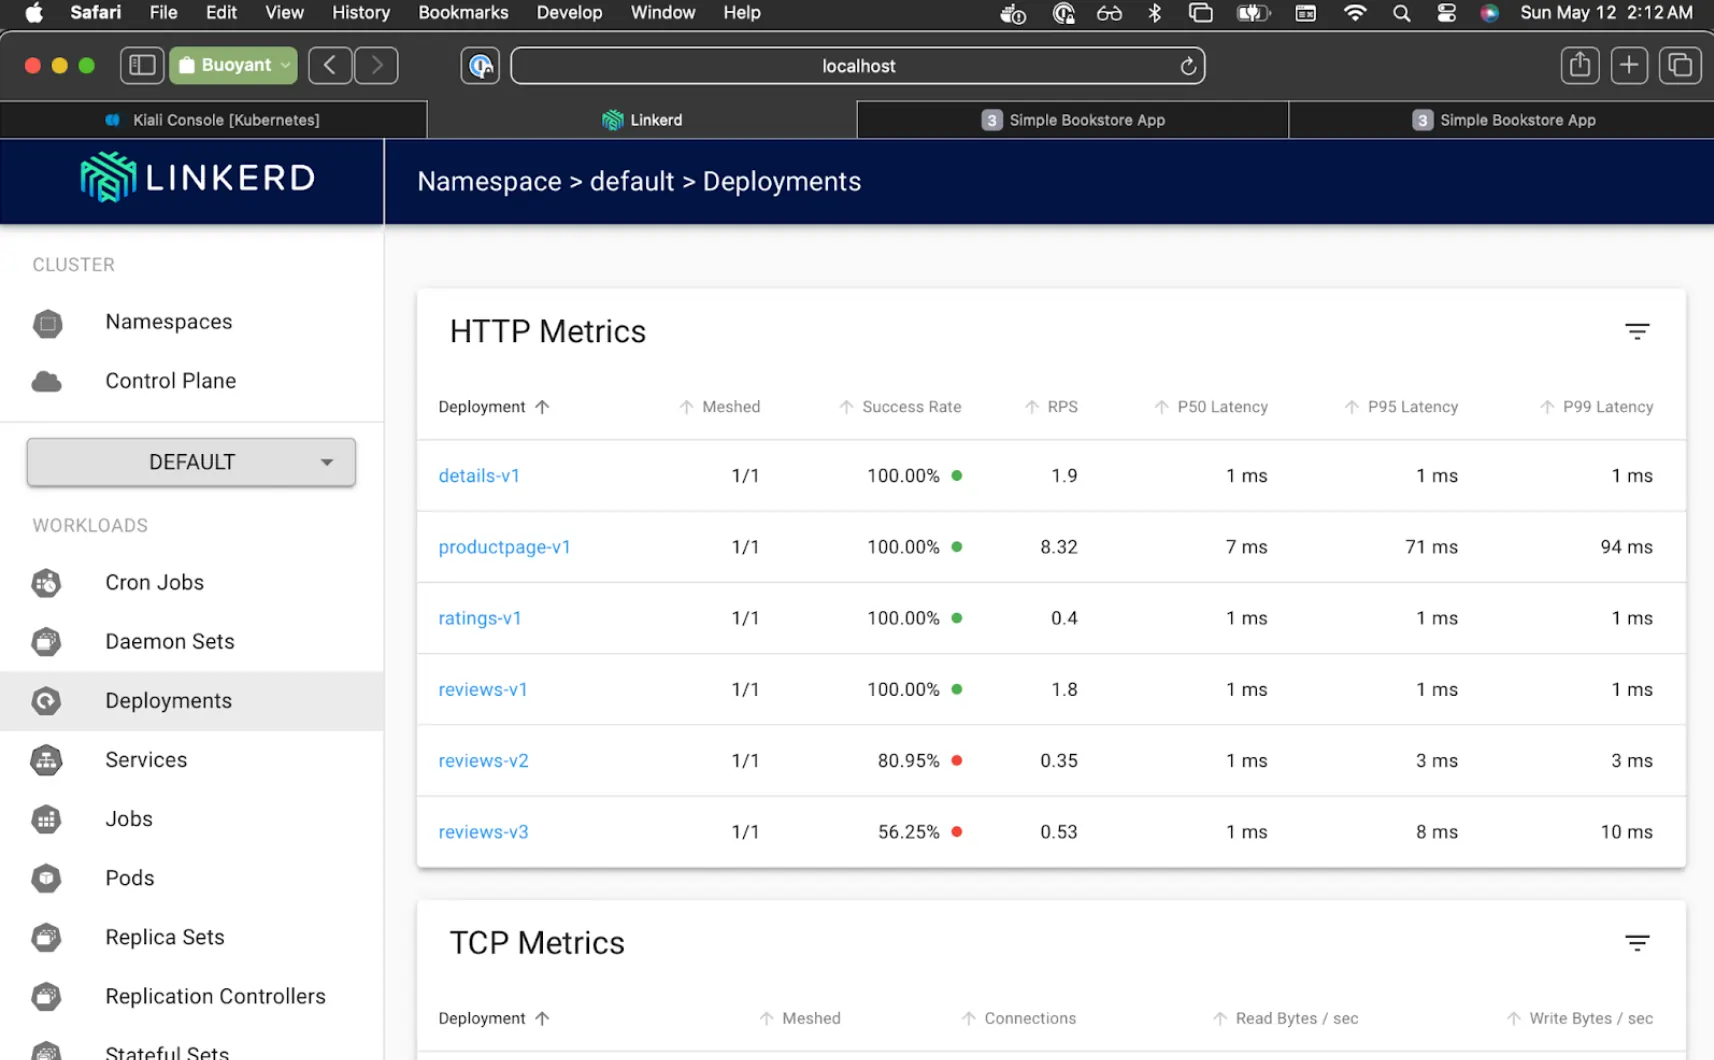
Now let's switch over to another service, but this time monitor the progress in Linkerd Viz:
$ kubectl rollout restart deployment reviews-v1
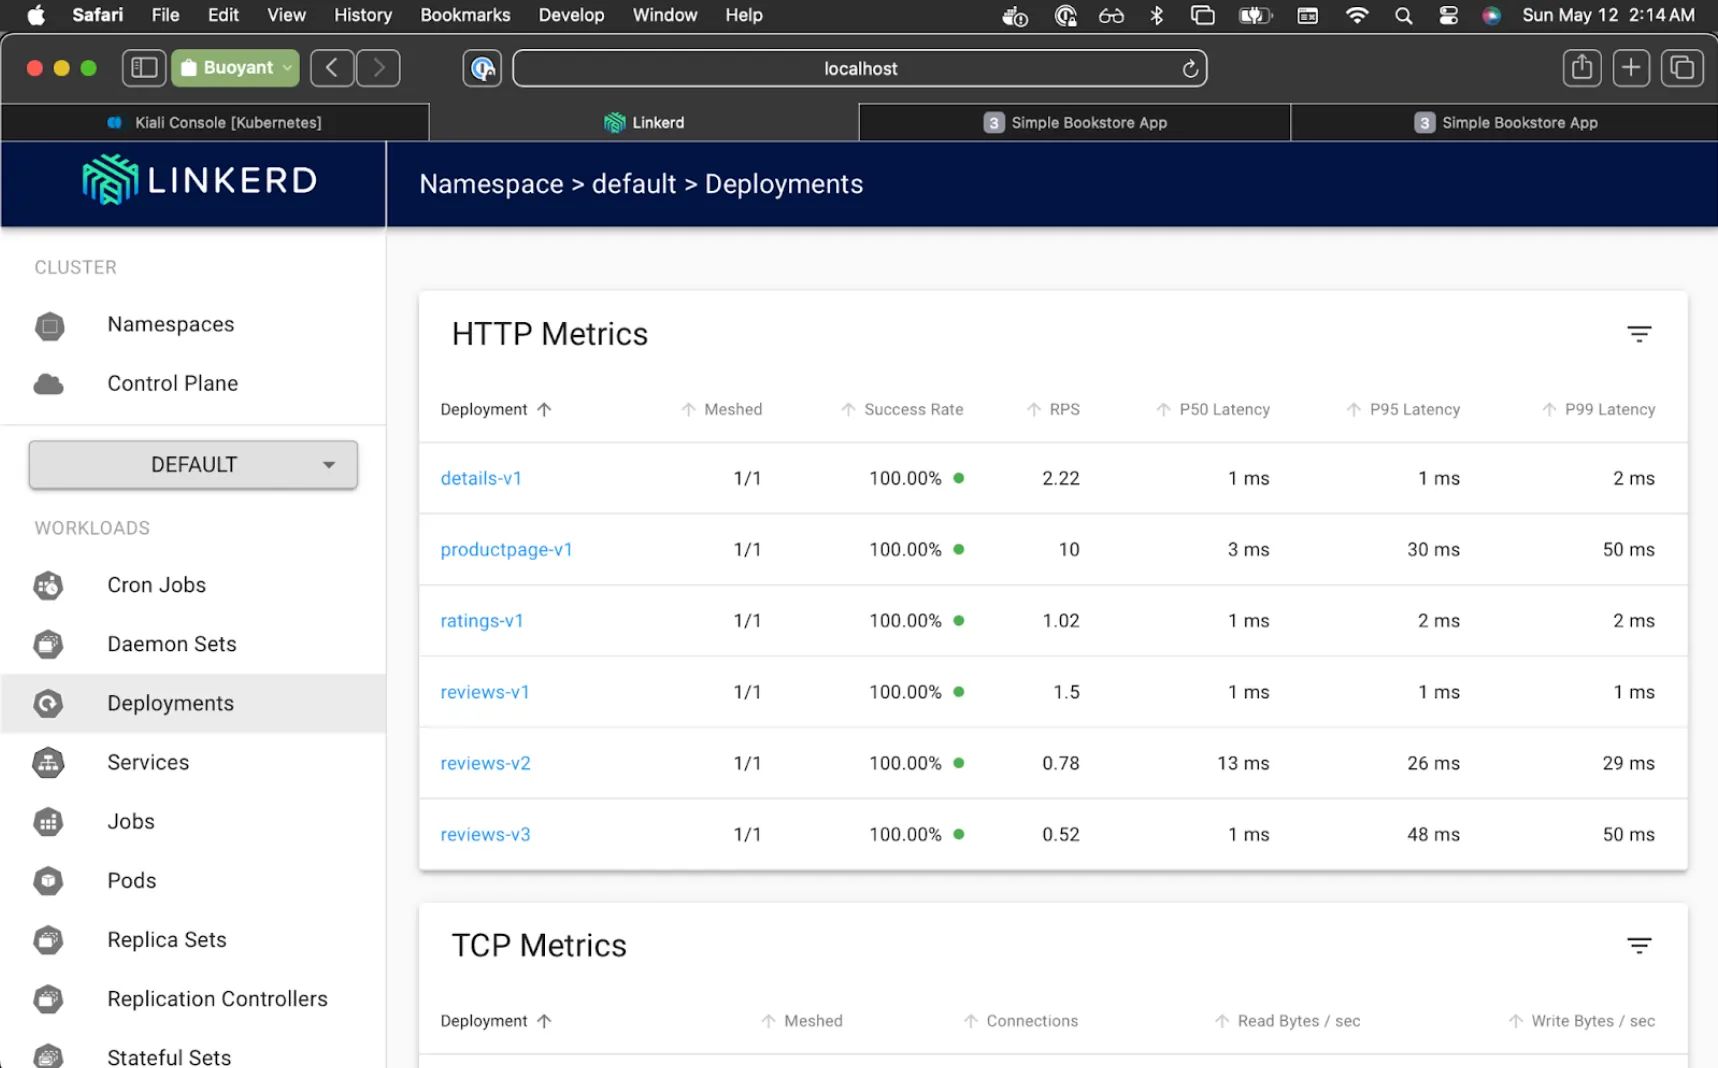
You can watch the success rate in viz slowly move up from 50% to 100%.
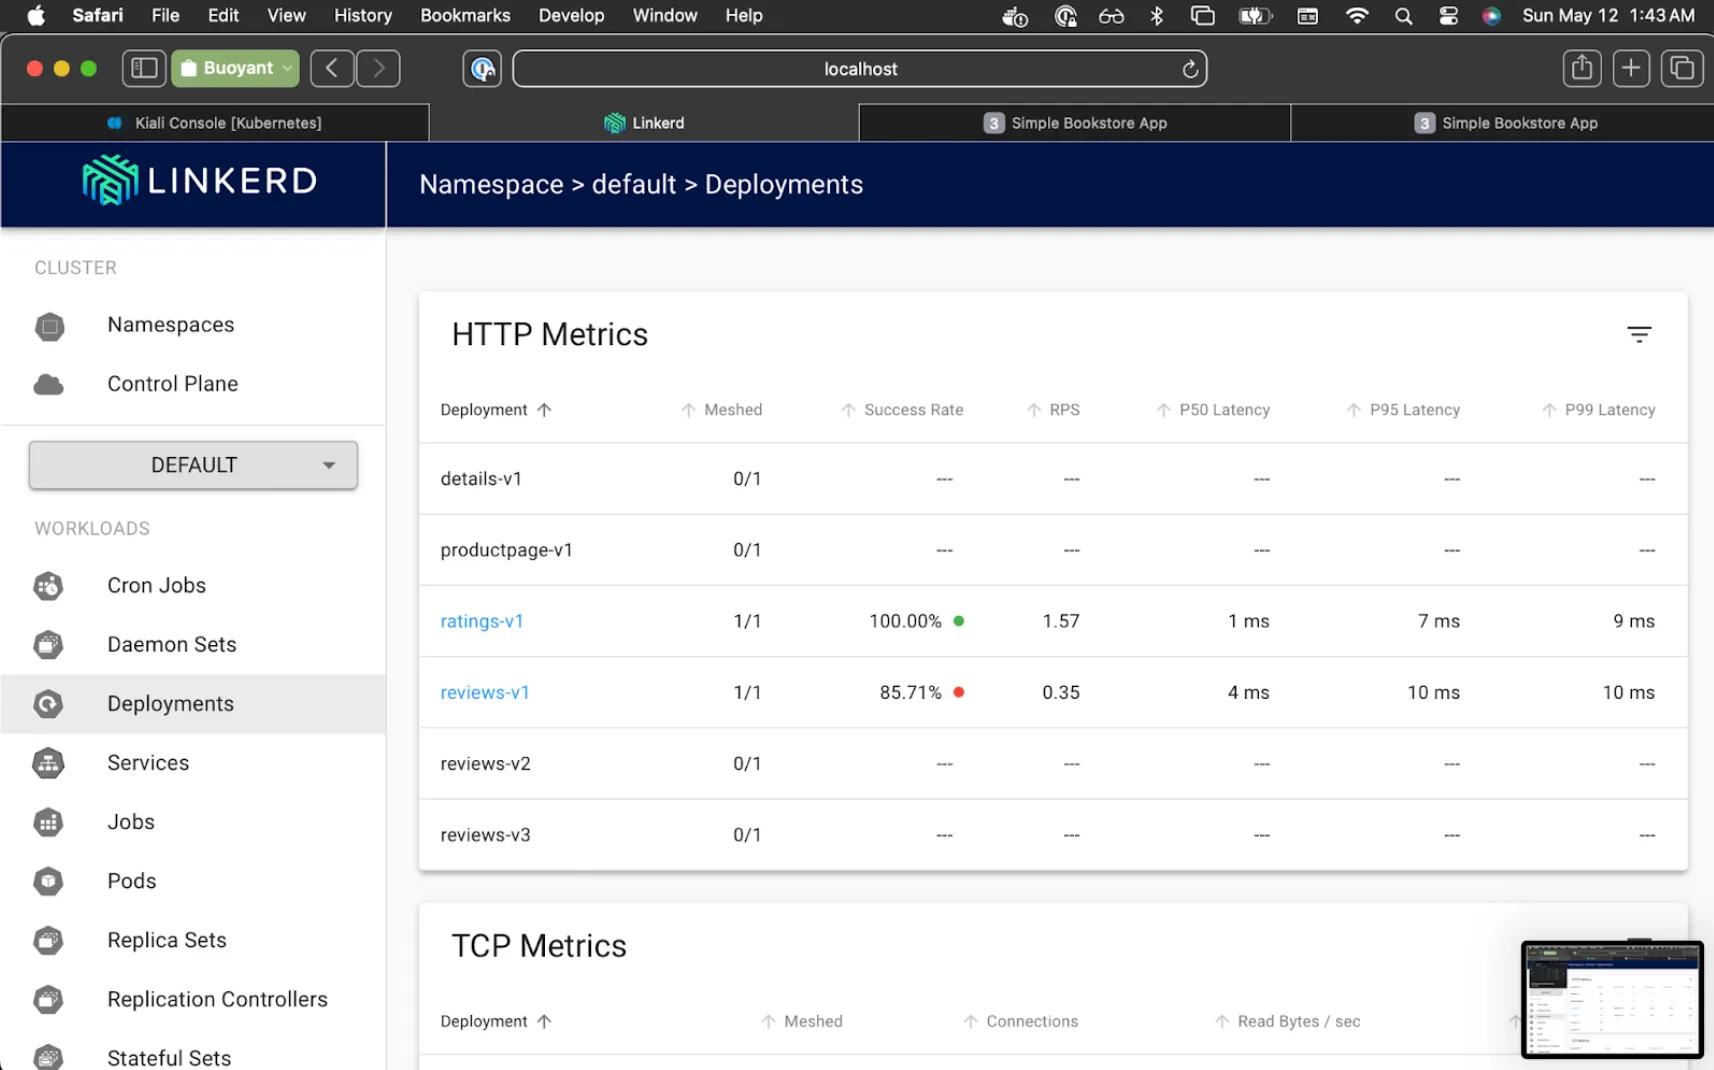
All the while we're getting HTTP 200 in our simulated traffic reports.
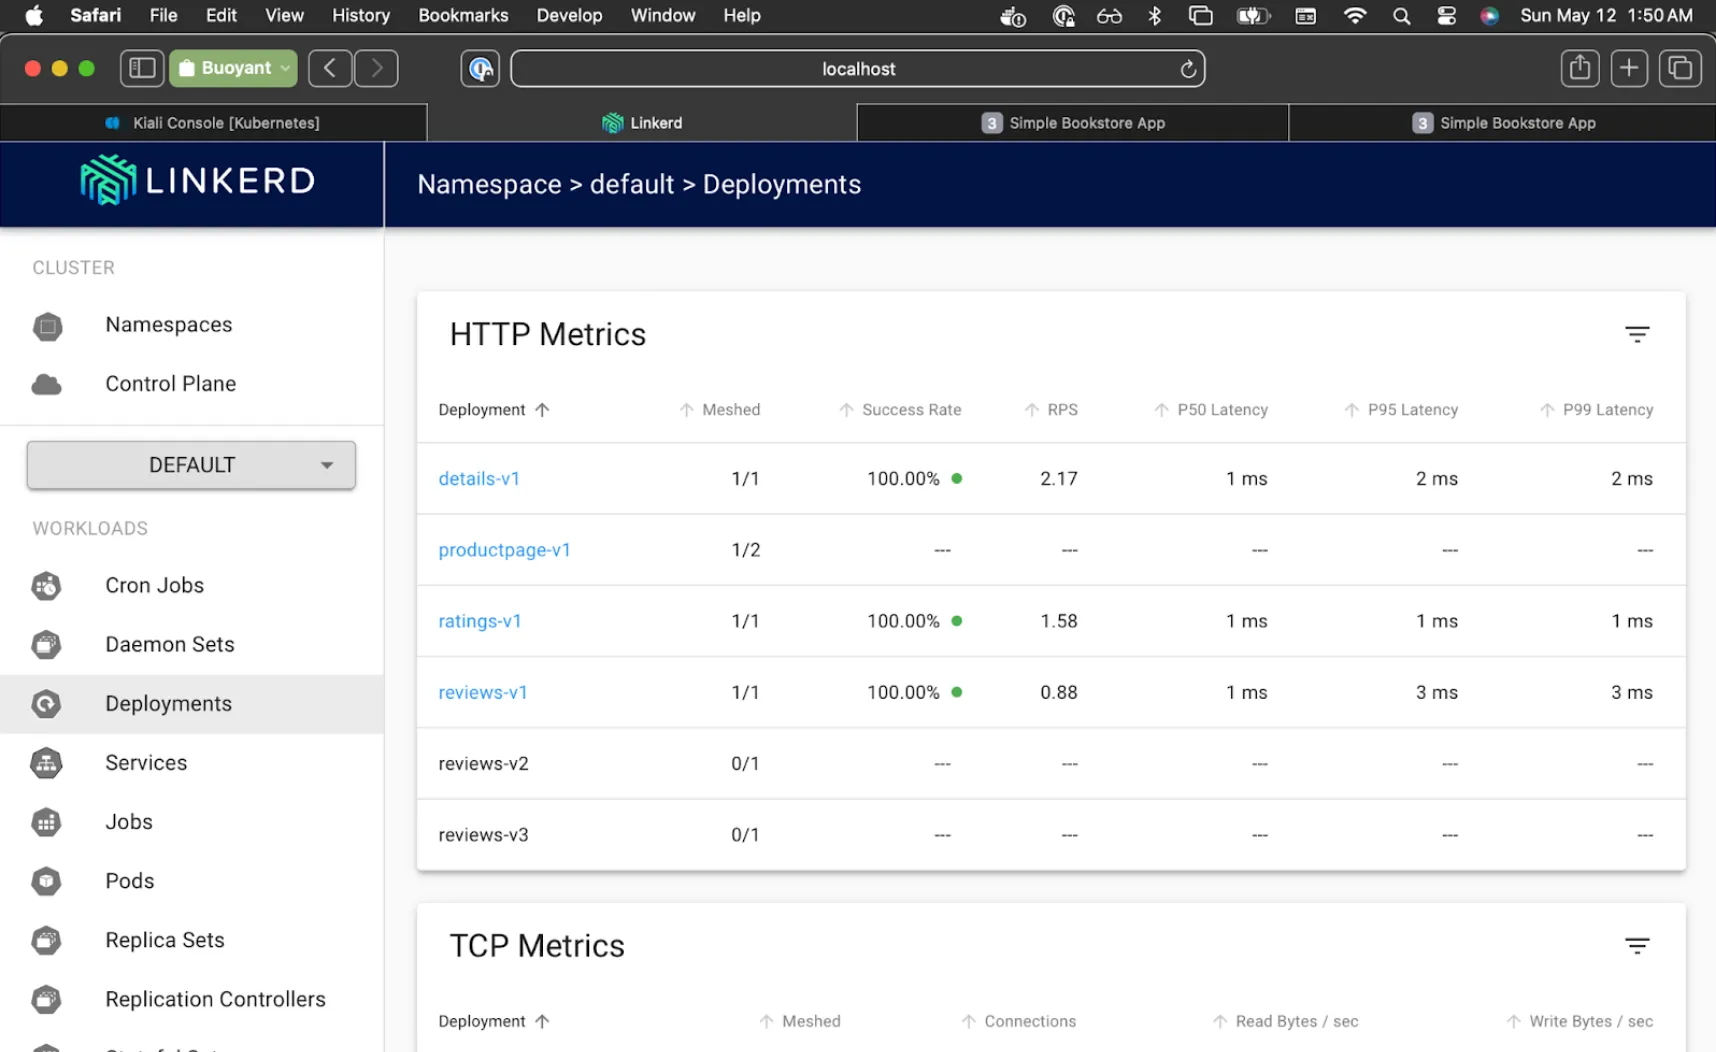
Everything seems to be running smoothly, so we'll repeat for the rest of the services:
$ kubectl rollout restart deployment reviews-v2 reviews-v3 details-v1 productpage-v1
Linkerd Viz will now show all services at 100%, and Kiali will now show "Empty Graph".
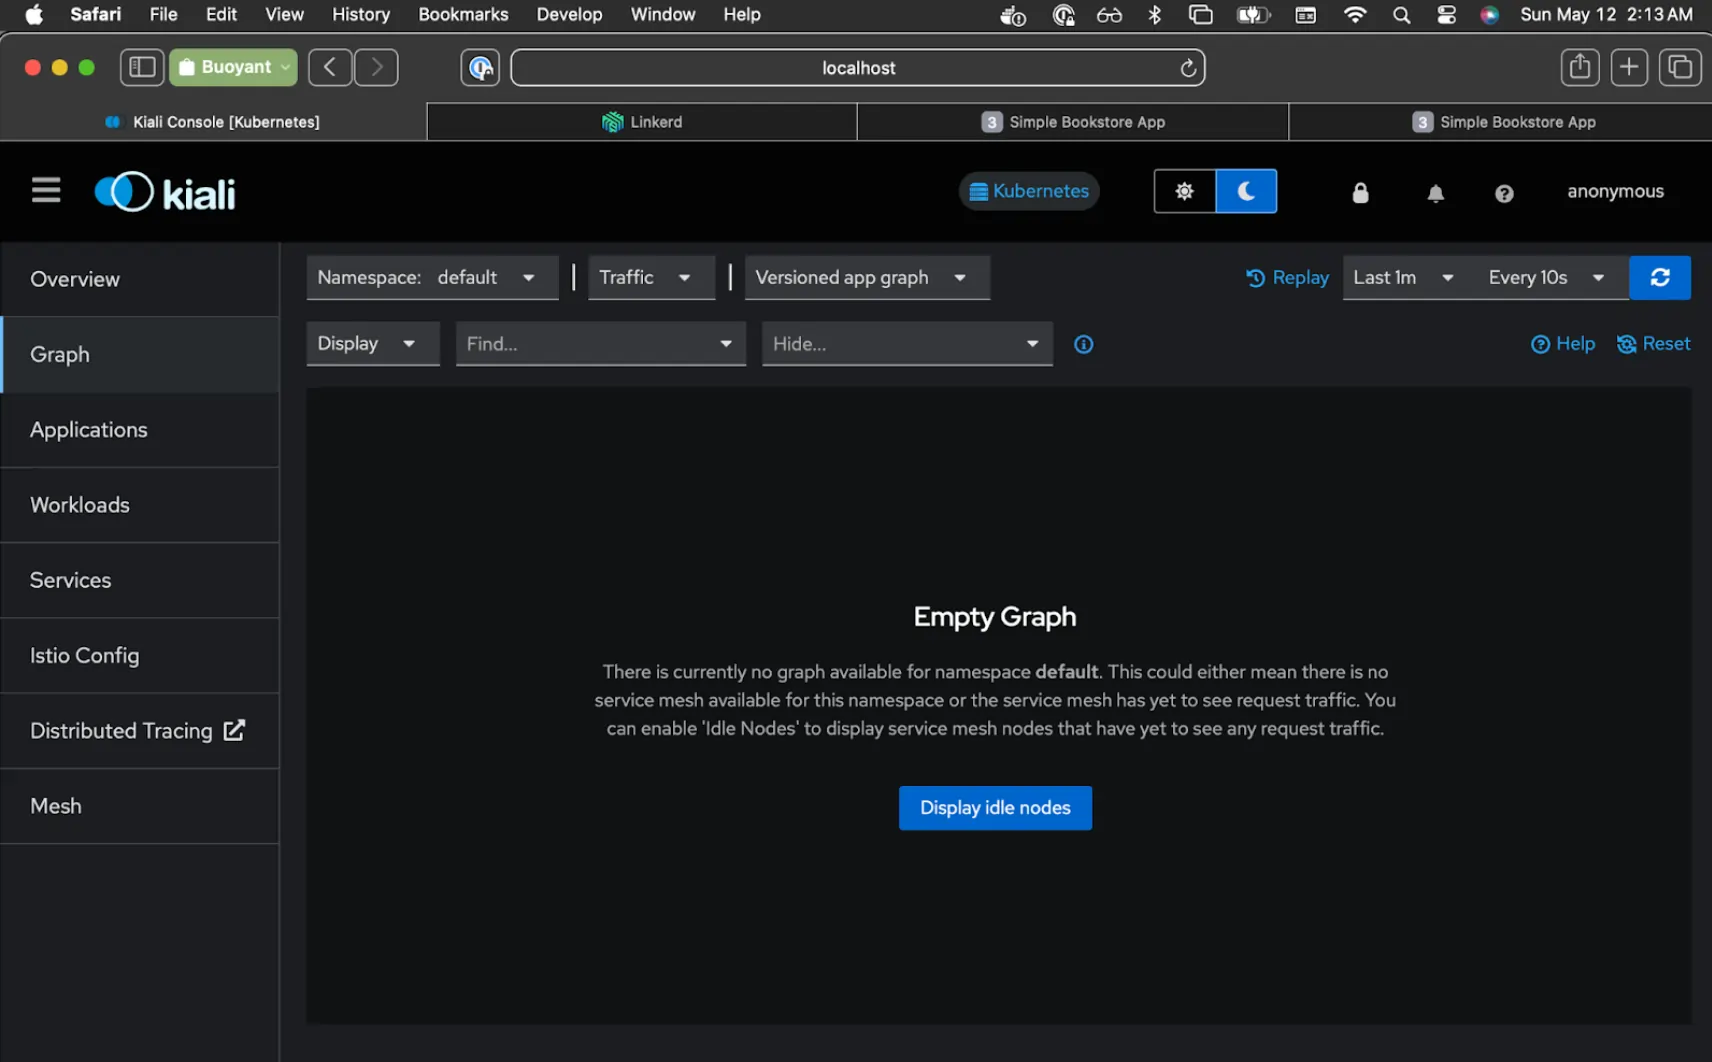
Lovely. We're all migrated!
💡But wait! What happened to running ingress2gateway like the migration blog post said?
As it happens, the booksapp is simple enough in its base configuration that it doesn’t need any extra configuration to work with Linkerd! So while we certainly could run ingress2gateway and explore more advanced topics like authorization policy, all we really need to do here is to switch meshes.
Cleanup
Remove Istio
Once you've done this for each of your services, and Istio is no longer responsible for any traffic to them, you can remove Istio altogether. Luckily Istio has a pretty easy way to do this:
$ istioctl uninstall --purge
All Istio resources will be pruned from the cluster -y
Removed <MANY THINGS>
✔ Uninstall complete

# Also remove Istio addons, including Kiali, using the
# Temporary directory you installed from earlier
$ kubectl delete -f $dir/samples/addons
Cleanup demo cluster
There you have it! Since we did this all locally, it's easy to clean up this demo by simply deleting your demo cluster.
$ k3d cluster delete demo
I hope you enjoyed the hands-on demonstration.
🙇 Digging into this has been a lot of fun, and I didn't do it alone. Big thanks to Sergio Méndez (Linkerd Ambassador) and Ariel Jatib, who've been at this for longer and helped encourage and guide my service mesh migration journey.


